Household maintenance, the importance of the bathroom fan cannot be overemphasized. Its function goes beyond mere water and odor elimination It also serves as a defender against mold as well as a safeguard for the integrity of doors and windows and also a facilitator of clean mirrors by preventing fog build-up. However the passing of time affects these trusted companions, making them tired and worn. Therefore, it is essential to bring in a new age by replacing them with a better quieter, more comfortable, and more durable model.
In navigating the maze of fan options, you should choose those with the lowest rating for sone within your budgetary limitations. This rating is an sonic gauge, separating the quiet from the loud with 0.5 similar to a peaceful whisper and 4.0 equal to the clamor of a TV set. Before you embark on this journey take care to deactivate the source of power at the panel for electrical power.
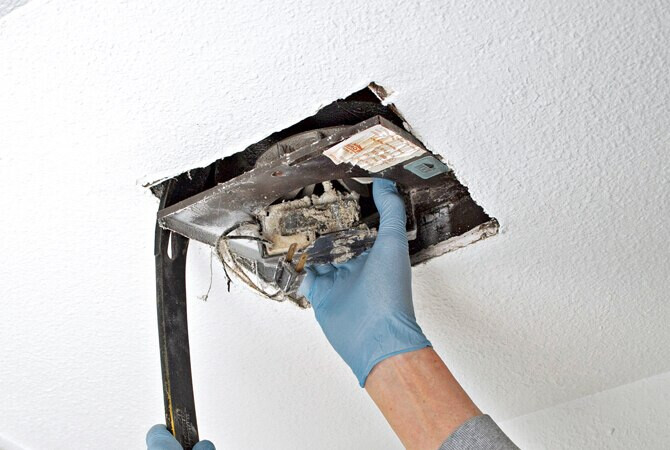
While the technical aspects of this task may appear simple, the actual execution has its own set issues, particularly when dealing with the removal of the outdated unit. Be prepared with work gloves, encasing long sleeves, a cap that protects and the essential shield of ocular and respiratory guardianship. Beware: in the course of your work, the inevitable loss of insulation will pour down on you.
Related Blog : How Much Does Hardwood Flooring Cost?
Tools Required
- Assorted drill bits
- Drill/driver
- Jab saw
- Ladder or stepladder
- Screwdriver
- Tape measure
- Voltage tester
Materials Required
- Bathroom fan
- Drywall screws
- Duct tape (optional)
- Wire nuts or wire connectors
- Zip ties (optional)
Safety considerations
Electricity flows out of the main breaker box to ensure complete shutdown. Expand and secure your ladder as far as possible before placing on solid surface ground, wearing eye protection, and being prepared for unexpected events; such as when uncovering old fans that have been hidden underground.
1. What size bathroom fan do I need?
When selecting a replacement fan, be sure to find one with dimensions matching those of your current opening and can generate sufficient airflow to meet the size requirements of your bathroom.
CFM (Cubic Feet Per Minute) measures the airflow capacity. A 50 CFM fan should suffice in a small bathroom while larger spaces should use at least 100CFM fans for optimal airflow.
To calculate the required CFM in your bathroom, take measurements of its length, width, and height before multiplying with width multiplied height and multiplying that figure by 0.13; round this resultant figure off to its nearest 10.
Before beginning, ensure that you have clear access to the housing of the ceiling fan.
Related Blog : Cut renovation costs : 10+ Best Ideas
2. Remove the bathroom fan cover
First step to replacing the fan cover is using an electric tester to verify that all power has been disconnected and there is no live power at the junction. Unfortunately, many breaker boxes have incorrect labels which makes this task even harder.
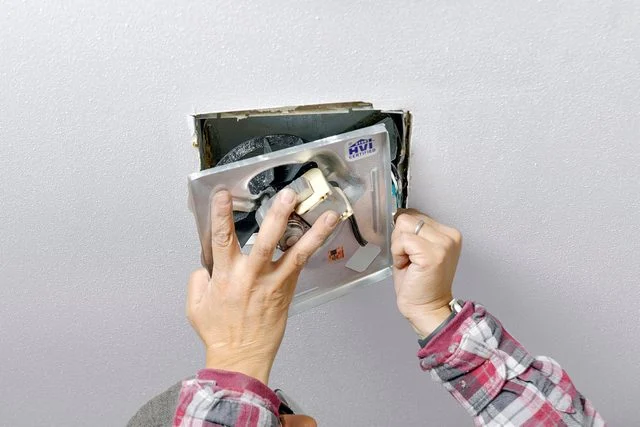
3. Separate the motor from the housing and the duct from the fan
As soon as you switch on your ceiling fan, an enclosure encasing its motor should appear. Locate and unscrew any screws securing its housing before carefully taking steps to unhook and extract the motor from its housing while protecting its wiring from damage before disconnecting and disposing of its wiring altogether.
Carefully unhook the fan from its ducting. Keep this ducting in place to use with the new fan and ensure its integrity.
Also read : How to Repair Garage Door Springs and Cables
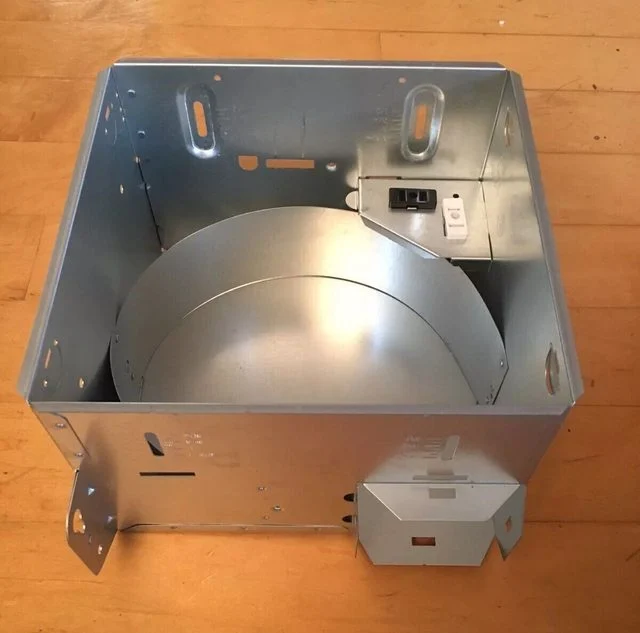
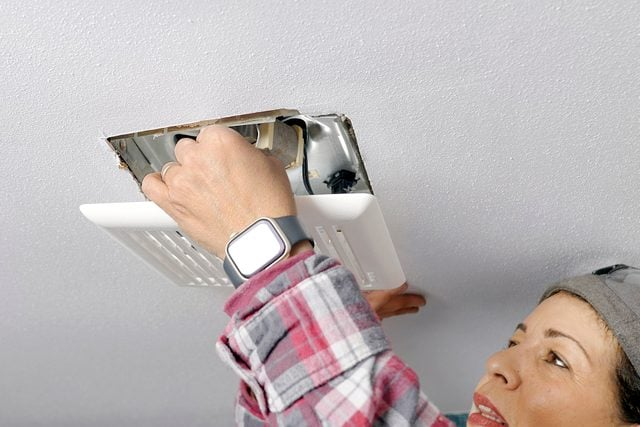
4. Reuse existing housing system or install new?
Examine whether the current housing is sufficient or if a new housing for the fan must be put in place. If the measurements of your current housing match the dimensions of your new fan’s dimensions and are not contaminated by water damage, then proceed with use. Replace the electrical components, which will seamlessly be incorporated to the housing you have already installed.
Think about the need for a new suspension or bracket. Be sure to follow the instructions provided by the manufacturer to attach the new fan. The methods might differ, but they’re generally simple.
If the housing of the old fan be secured using mounting brackets, requiring removal using oscillating or reciprocating saw, be cautious to avoid damaging ductwork, wiring, or drywall.
Make sure that the installation is secure following the established guidelines. Failure to follow these guidelines could cause instability and eventually the fan’s detachment.
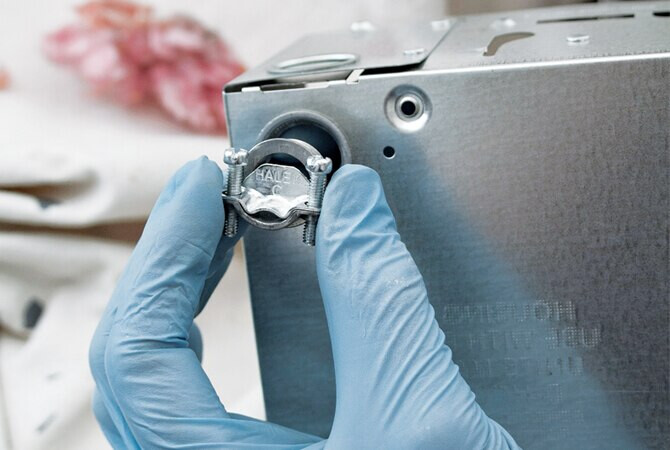
5. Connect air exhaust duct to fan
Connect the existing air exhaust pipe to the new fan. If it does not fit perfectly fix it using zip tie.
Related Blog : How to Install a Ceiling Light Fixture
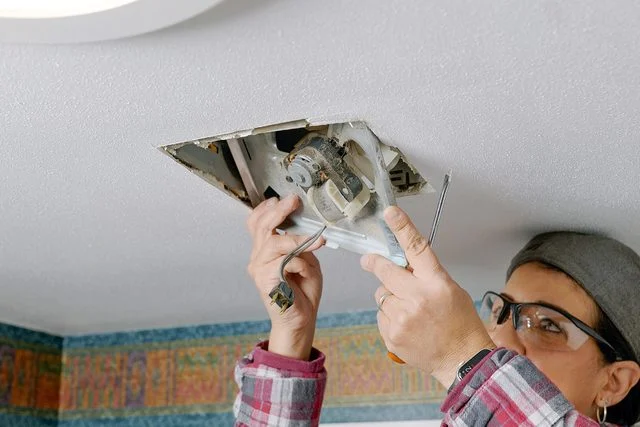
6. Connect electric wires
When connecting the wires ensure that you adhere to the scheme of color Match white to white black to black and green (ground) to green. Certain new fans come with clip-on connectors that are convenient for quick and easy attachment. If your fan does not have these connectors, purchase them separately or use wire nuts that are more traditional.
7. Secure the fan
Begin by tucking the air exhaust duct. Next, move the fan into place and secure it to the brackets or hanging system. While some fans clip into place, other might require screws.
Also read : How much does change light bulbs cost?
8. Test the electric connection
Before attaching the cover, turn off the power to the breaker and turn on the fan to confirm the correct operation.
If the fan is unable to work, ensure that you have turned off the power source at the breaker prior to starting troubleshooting.
9. Attach the fan cover
Install the cover, ensuring that it is level against the ceiling, and parallel to the wall of your bathroom. The human eye is able to detect any irregularity or misalignment.
FAQs
What happens if a bathroom fan is too powerful?
Bathrooms can become noisy and cold spaces.
What happens if a bathroom fan isn’t powerful enough?
An exhaust fan should be large enough to effectively circulate fresh air while drawing humid air outside, and draw it through an appropriate filtering system. Small fans cannot effectively cycle out moisture, which may otherwise get trapped inside cabinets and mirrors and promote the growth of black mold or mildew growth. Therefore, it is crucial that accurately determine your bathroom dimensions prior to installing an appropriate ventilator that matches them.
How many years will a bathroom fan last?
Manufacturers typically estimate a showerhead will last 10 years with proper maintenance. If yours has outlived this estimation, expect for it to break or be replaced when painting or renovating your bathroom.
Is it bad to leave a bathroom fan on all night?
Yes, bathroom exhaust fans can overheat when used frequently.
More Blog : Abetterhandyman